Select a site alphabetically from the choices shown in the box below. Alternatively, browse sculptural examples using the Forward/Back buttons.
Chapters for this volume, along with copies of original in-text images, are available here.


Object type: Part of grave-cover [1]
Measurements: L. 51 cm (20 in); W. 42 cm (16.5 in); D. 26.5 cm (10.5 in)
Stone type: Limestone, yellow-brown, medium to coarse grained, ooidal and bioclastic. Middle Jurassic, Bajocian, Upper Lincolnshire Limestone Formation, Ancaster Stone
Plate numbers in printed volume: Ills. 53-8, Figs. 8, 20
Corpus volume reference: Vol 12 p. 125-8
(There may be more views or larger images available for this item. Click on the thumbnail image to view.)
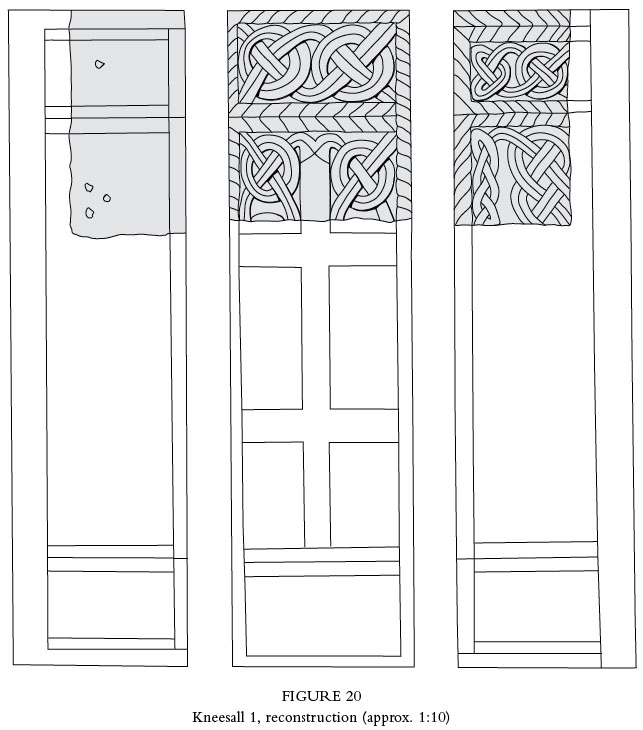
The stone still extant at Kneesall represents somewhat less than one third of a mid-Kesteven grave-cover (Everson and Stocker 1999, 36–46). It represents one end of the original monument, whose decoration seems to have been laid out in the manner typical of the group (Fig. 20).
A (top): From the 'lid' of the grave-cover, face A retains a complete transverse panel and the upper part of the central longitudinal panel, both decorated with interlace in low relief. The outside arris of the grave-cover was decorated with cable-moulding, though this is in poor condition to the right (when viewed from the broken end) and imperceptible to the left. The transverse panel is divided from the longitudinal panel by a short run of double-cable moulding. Within the transverse panel is a unit of four-strand plait not found elsewhere in the mid-Kesteven cover series, consisting of two 'free rings' bound within a pair of running strands (closed-circuit pattern A: Cramp 1991, fig. 24). Both free rings and running strands are elaborated with an incised medial line, though the trimming back of the surface has resulted in this detail being lost in many parts of the design. The longitudinal panel is represented by the upper arm of the double-ended cross typical of the group. It is flanked by two runs of interlace that emerge from the upper angles of the cross-arm itself. The interlace pattern is the same on both sides of the cross-arm, consisting of two free rings closing a four-strand plait. There is no more than a hint that these interlace strands were elaborated with an incised medial line, but they perhaps also emerged from the upper end of the cross terminal.
B (long): This face retains the well-preserved remains of the side panel of a typical member of the mid-Kesteven group, though it is missing about ten centimetres of plinth along its lower edge. The arrises are decorated with cable moulding throughout; in those between the transverse end panel and the end of the stone, and between the end panel and the longitudinal panel, the cables are both doubled. Within, the panels are decorated with interlace in low relief, and both the interlace strands in the transverse panel and the lower of the two strands in the longitudinal panel are enhanced with an incised medial line. Within the transverse end panel the interlace unit takes the form of motif type viii (Everson and Stocker 1999, fig. 10). Within the longitudinal panel, only the start of the interlace survives, and here it is clear that decoration was organized into two tiers. The lower tier, which has interlace ornamented with an incised line, appears to have been a continuous four-strand plait (at least within this part of the monument). The upper tier of decoration, which is not separated from the lower by any moulding or fillet, is a simple three-strand plait. The stone is truncated well short of the place where a 'bull's head' at the centre of the panel would have appeared, but the presence of the two different scales of interlace plait confirms that such a bull's head would have been present, with the three-strand plait developing from its 'horns'.
C (end): This face probably faced outwards when the stone was reused as walling rubble in the tower fabric; nevertheless it probably represents the original end of the monument. As is typical, it shows no sign of having been decorated.
D (long): This face has been dressed back by approximately five millimetres, leaving virtually no sign of the original ornament with which no doubt it was once decorated. In the strongest raking light, the bases of four holes are still detectable. Three of them are grouped together in a way that perhaps indicates the original presence of a four-strand plait.
E (end): This face represents the division of the monument into (perhaps three) sections in reuse, and therefore does not retain any original decoration. It incorporates a crude rebate, which must be related to that reuse.
F (bottom): This face is secondary and created when the plinth of the original monument was cut away during the stone's reuse. There is a setting-out line along one edge, which relates to the re-cutting of the stone for reuse.
There can be little doubt that this grave-cover belongs to the series of 47 monuments of the mid-Kesteven group; it was included within the original listings of monuments of this type (Everson and Stocker 1999, 36–46, fig. 9; this volume, pp. 53–61, Fig. 8). For all that the interlace pattern within the transverse panel on the lid is not replicated precisely on any other example, the monument from Kneesall seems to have no markedly individualistic features. The lid was evidently decorated with a double-ended cross, in the usual manner, surrounded by interlace incorporating free rings as also seen at Toft-next-Newton, Lincolnshire (ibid., 267–9), whilst the decoration on the side panel can be compared with many other examples. Kneesall is not the most distant monument in the group from the quarry sources around Ancaster, although it apparently lies further north west than any other (Fig. 9, p. 60). Kneesall is located at a considerable elevation above the floors of local river valleys, but it is within easy reach of water transport.
[1] The following is an unpublished manuscript reference to Kneesall 1: BL, Add. MS 37552, ff. 172–3, illus.; 193, illus.; 215; 216 (Romilly Allen collection).
[2] Guilford (1927, 106) gives St Helen.
