Select a site alphabetically from the choices shown in the box below. Alternatively, browse sculptural examples using the Forward/Back buttons.
Chapters for this volume, along with copies of original in-text images, are available here.


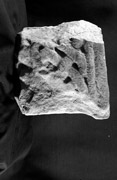
Object type: Broken element of a shaft
Measurements: H. 18.3 cm (7.2 in); W. 23.5 cm (9.25 in); D. 16.6 cm (6.6 in)
Stone type: Greyish orange pink (5YR 7/2), moderately to well sorted, clast-supported, quartz sandstone. The sub-angular to sub-rounded clasts mostly vary from 0.2 to 0.4 mm, but are dominantly 0.3 mm across. Helsby Sandstone Formation, Sherwood Sandstone Group, Triassic (C.R.B.)
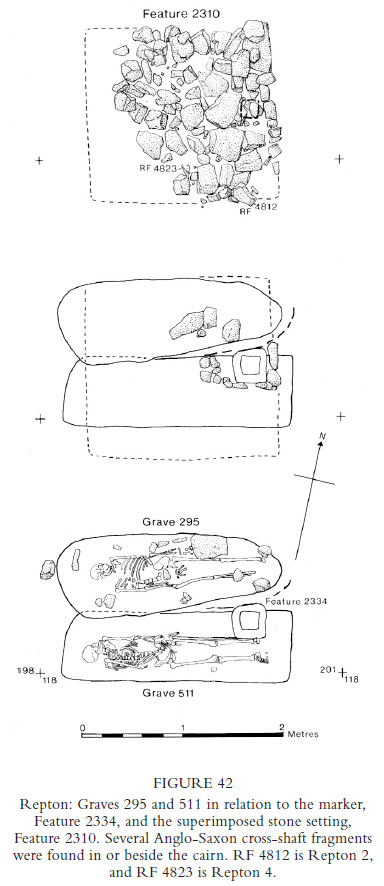
Plate numbers in printed volume: Ills. 255–60; Fig. 42
Corpus volume reference: Vol 13 p. 205-207
(There may be more views or larger images available for this item. Click on the thumbnail image to view.)
 A (broad): The left half of a stone once about 33 cm (13 in) wide. The frame on the left consists of a flat angle moulding 1.8 cm (0.5 in) wide, with some erratic, faint but diagonal lines, which are unlikely to be primary. Along the inside and parallel to the angle moulding is a narrower, rounded moulding with an irregular inner edge where it meets the interlace contained by the frame. The frame at the top is missing. The interlace consists of a single plain rounded strand, a little wider than the inner frame, one end of which ends in an expanded flat triangle. This appears to be the weathered remains of a small snake twisted into a pattern A interlace knot (Cramp 1991, xxx), consisting of one strand and ending in a triangular head to the lower right. The end curl is missing in the damage to the upper left corner of the stone.
B (narrow): This broken surface across the middle of the stone reveals a dowel hole (originally on the central axis) running the full height of the stone, here 17 cm (6.7 in). It is about 3.3 cm (1.3 in) in diameter, and appears to have been drilled in two phases, perhaps from either end, as it wanders slightly out of alignment. To the right of the dowel hole the scar is fresh and un-weathered, and could be the result of a single blow. To the left are scars of several smaller blows and this surface is weathered.
C (broad): Like A, this side was broken across the middle. The interlace pattern immediately to the right of the break has survived, but the right part of the pattern and the frame are missing, removed by blows which cut off the whole corner, with two lesser blows removing the upper frame. The interlace is of the same character as that on A. If the pattern on A repeats, there may have been snakes of pattern E type (ibid.) to either side of C, linked by complicated interlace in the middle. At the bottom of the carved surface, immediately right of the middle, is a 2 cm (0.8 in) scalloped scar, as if something had been chiselled or adzed away.
D (narrow): Because the whole right half of the carving has survived from left of centre to the right side of the stone, this is the only face from which the whole interlace pattern can be inferred. On what would have been the middle of the face is the upper end of a crossing strand with a rounded pattern F terminal 4.5 cm (1.8 in) wide where it abuts the frame and about 2.2 cm (0.9 in) wide at the top of the shaft. The shaft expands slightly towards the bottom of the stone. In the top right corner is an almost complete pattern A interlaced snake with its flat triangular head at the bottom and curled over tail in the top right corner of the frame. In the right light, two round eyes can be made out on top of the head, rather than protuberant and attached to the side as, for example, on the interlace snake on the tenth-century Hovingham 1 cross (Lang 1991, 144–5, ills. 486–7). The point of the triangle head is missing. The recessed background is pecked or punched.
E (upper bed face): An approximately 2.5 cm (1 in) raised edge surrounds the surviving recessed part of the upper face of the stone. This band has a slightly rounded external edge, a flat top, and a sloping inner edge. The one surviving internal angle is rounded, rather than cut into a right-angle. The surface inside the frame is recessed 1.2 cm (0.5 in) inside the frame but slopes towards the centre (i.e. towards the dowel hole) to a depth of 2 cm (0.75 in). The recessed area is dressed with tool marks almost at right-angles to C and D, but parallel to A (where the raised edge is missing). Towards the centre are irregular deeper marks up to 2.5 cm (1 in) long and groups of fine parallel lines. We here see the primary rough shaping of the surface, which was then fine-finished with a sharp narrow chisel along the edges and in the interior to remove rough areas. The recessed area shows that whatever stood on E would have been about 27 cm (10.6 in) long and 18 cm (7.1 in) wide, i.e. 1½ times as long as it was wide. This could be the seating for the uppermost element, the cross itself, and compares, in so far as that can be measured, with the seating for the cross-head set over Repton 1/i which seems to have been 45 cm (17.7 in, c.1.5 ft) long and 30 cm (11.8 in, c. 1 ft) wide, and so 1½ times as long as it is wide.
F (lower bed face): This bed face does not survive near the edges of the stone. The finish is flat but quite rough. It is not recessed to receive a cross-element within a visible frame as is E, but rather the bottom of a shaft element to be dowelled onto the surface of the element below, whether recessed or not.
Restrained interlace, as seen on this stone, is frequently seen, as on the eighth-century piece from Filey (1), north Yorkshire (Lang 1991, ill. 450), and the stone plaque from Britford (1), Wiltshire, dated to c. 800 (Cramp 2006a, ill. 416). Other examples come from Reculver (1) (Tweddle et al. 1995, ills. 119–20) and Rochester (1) (ibid., ill. 141) in Kent, both early ninth century, and from Lastingham (11), north Yorkshire on a piece of eighth- to ninth-century date (Lang 1991, ills. 618–21). At Lastingham there are several examples of plain-edged mouldings framing ‘stringy runs of interlace, consisting of three or two-and-a-half registers of half patterns A’ which are not unlike that on Repton 2. They are said to date to the eighth or ninth century because ‘the interlace pattern is controlled and pre-Viking’. Repton 2 seems to fall into this category, reflecting the position of Repton in the middle of the country receiving influences from every direction. The Kentish parallels are unsurprising at this time.
