Select a site alphabetically from the choices shown in the box below. Alternatively, browse sculptural examples using the Forward/Back buttons.
Chapters for this volume, along with copies of original in-text images, are available here.


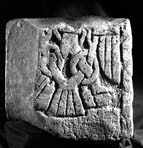
Object type: Three cross-shaft fragments, possibly parts of one cross [1]
Measurements:
a: H. 31 cm (12.1 in); W. (incomplete) 25 > 19 cm (9.8 > 7.5 in) D. 19 > 18 cm (7.5 > 7.1 in)
b: H. 33 cm (13 in); W. 34 cm (13.3 in); D. 20 cm (7.9 in)
c: H. 33 cm (13 in); W. (at base) 35 cm (13.7 in); D. 22 cm (8.6 in)
Stone type:
2a: Sandstone, pale yellow, medium grained, sucrosic, quartz-cemented, slightly micaceous. Carboniferous (Pennine Coal Measures Group)
2b: Sandstone, pale yellow-buff, fine to medium grained, silica cemented, ferruginous speckling. Carboniferous (?Pennine Coal Measures Group)
2c: (same sandstone as 2b) Sandstone, pale yellow-buff, fine to medium grained, silica cemented, ferruginous speckling. Carboniferous (?Pennine Coal Measures Group)
Leeds (St Peter) 2b and 2c are very probably from the same cross. [G.L.]
Plate numbers in printed volume: Ills. 487, 493-504
Corpus volume reference: Vol 8 p. 202-3
(There may be more views or larger images available for this item. Click on the thumbnail image to view.)
Three fragments of a cross -shaft, all showing evidence of cabled edge mouldings. The style is similar on all pieces and is strongly reminiscent of Leeds 1 except in the use of cable mouldings.
A (broad): 2a has a fragment of the torso of a frontal figure with a very simplified stylised robe and arms expressed as boneless curves holding a book in front of his body. A very worn cable-moulded edge survives on the right. 2b is quite battered. It has cable moulding on both edges, and between them again the torso of a frontal figure expressed as very stylised looping curves, almost like a very squeezed key pattern. Below is part of a long plain under-robe. 2c has the lower part of a Weland scene as on Leeds 1Ciii (Ill. 485), in fact supplying some of the missing detail from the bottom centre of that scene (Ill. 487). The upper part of the scene with the woman is completely missing. A cable moulding survives on the right.
B (narrow): 2a and 2b have cable mouldings on both edges; 2c is not complete in width and has the cable moulding only on the left-hand edge. It is battered but shows a section of the plain area from the foot of the shaft. The two upper fragments have short runs of a three-cord twist, and 2c credibly has part of the Stafford Knot (simple pattern E) termination of the plait.
C (broad): 2a and 2c show evidence that this face had a run of ring-knots (turned pattern C with added diagonal), that on 2c showing the termination of the pattern as a simple joining of the strands from the lowest knot. 2b has evidence of strands which could belong to the glide between knots. 2a has worn cable edging on the left, 2b and 2c on the right.
D (narrow): Missing on 2a; 2b has a fragment of three-cord plait identical with face B, but 2c appears to show it had animal-head terminals. The head in the bottom left corner has a round incised eye and a stubby snout-like jaw.
These fragments are more stylised than Leeds 1 but are clearly related to it. Lang (1976a, 91–2, figs. 7a–b) used the lowest section on face A to reconstruct the design on Leeds 1, face C. It is not impossible that these three fragments belong together, as Collingwood believed, and a similar programme including frontal figures in panels is suggested. The simpler patterns on the sides and the appearance of runs of interlace without plant-scroll suggest a simplification of the programme on Leeds 1.
