Select a site alphabetically from the choices shown in the box below. Alternatively, browse sculptural examples using the Forward/Back buttons.
Chapters for this volume, along with copies of original in-text images, are available here.


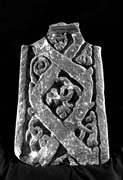
Object type: Part of cross-shaft [1]
Measurements: H. 38 cm (15 in); W. 26 > 21.5 cm (10. 2 > 8.4 in); (below ?neck) D. 13.5 > 10.8 cm (5.3 > 4.2 in)
Stone type: As Collingham (St Oswald) 1 but not burnt. Bedding planes and stylistic evidence suggest that fragments Collingham (St Oswald) 3 and 5 are part of the same cross, Collingham (St Oswald) 5 being the right-hand arm of the cross. [J.S.]
Plate numbers in printed volume: Ills. 153–6
Corpus volume reference: Vol 8 p. 122-3
(There may be more views or larger images available for this item. Click on the thumbnail image to view.)
A tapering cross-shaft of rectangular section. The angles are square and all faces are edged by flat mouldings. The ornament on all faces is continuous.
A (broad): The face is dominated by an angular medallion scroll, of which two half and one complete medallions survive. The stems are broad and flat. In the half-medallion at the bottom is a strand probably from a tendril. Above in the spandrel to the left, one tendril curls down from the upper stem and ends in a petalled leaf-flower: it links with a flowerless tendril springing from the strand below. In the spandrel on the right, slender tendrils again spring from both upper and lower stems to link in the centre of the spandrel: each terminates in a tri-lobed fruit or leaf-flower. The linked tendril motif dominates the centre of the complete medallion, although the terminations have possibly five petals/leaves. The spandrel above on the left has a single plain spiral tendril; that on the right has a frond-like leaf apparently depending from the stem above. A larger flower or berry bunch fills the lower triangular space of the half-medallion above.
B (narrow): The face is dominated by a heavy-looking continuous step pattern of type 1, with incised outlines and inner incised line, to give an impression of broad flat bands.
C (broad): A large-scale interlace, double-stranded. The lowest motif is incomplete but it produces a glide which feeds into one register of simple pattern F. A second glide above moves to form what looks like a simple pattern E in which, however, both double-strands merge on the left, before continuing into another incomplete knot above.
D (narrow): A meander of type 2, with a single broad strand completely filling the available space.
It is possible, as the geology suggests, that this may be part of the same cross as the arm Collingham 5. Crossing medallion scrolls have a long history in Wharfedale, found also at Otley, Ilkley, Kirkby Wharfe, Guiseley, Addingham and Barwick in Elmet (Chap. V, p. 53). This is also interesting in the light of the distribution evidenced by the 'right-angled crossing' of interlace in cross-heads, and the tendril pattern (see Collingham 5 below and Chap. V, p. 49). The double-stranded, large-scale interlace and the side-filling, heavy step and meander patterns are all features of the period of Scandinavian influence in sculpture, while the medallion scroll, though flattened and stylised, shows the continuing influence of Anglian taste, again nodding to major earlier sculptures such as Otley 1 (see Ills. 561–3). The angular, lattice-like version of the scroll on this shaft is so like the example from Kirkby Wharfe, no. 2 (Ill. 436), a site which also has cross-heads of a similar style and concept to Collingham 5, that the same sculptor or workshop is indicated. See also the discussion of Collingham 5 below.
