Select a site alphabetically from the choices shown in the box below. Alternatively, browse sculptural examples using the Forward/Back buttons.
Chapters for this volume, along with copies of original in-text images, are available here.


Object type: Part of shaft [1][2]
Measurements: H. 78 cm (30.75 in); W. 38 > 32 cm (15 > 12.5 in); D. 26 > 22 cm (10.25 > 8.75 in)
Stone type: Finely bedded with bedding parallel to front face, pale brown (5YR 5/2), moderately sorted, clast-supported, quartz sandstone. The sub-angular to sub-rounded clasts range from fine-grained (0.2 mm) to coarse-grained (0.9 mm), but are mostly medium- to coarse-grained in the range 0.4 to 0.6 mm. Ward's Stone Sandstone Formation, Millstone Grit, Carboniferous
Plate numbers in printed volume: Ills. 508-11, 514-5
Corpus volume reference: Vol 9 p. 196-9
(There may be more views or larger images available for this item. Click on the thumbnail image to view.)
On all faces the lower 25 cm (9.75 in) of the stone is offset to form a base.
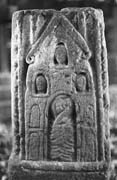
A (broad): Above the unornamented base is an incomplete single panel, flanked laterally and below by a cable moulding; a narrower inner roll moulding runs down the sides. The panel contains a gabled structure with in-turned eaves, the steeply-sloping gable carrying two long-stemmed crosses of type A10; the stem of a possible third cross is visible at the apex. An arched moulding forms a central doorway in which is set a human figure whose half-profile head and body are swathed in fabric; the folds are represented by deeply moulded ribbing. No facial details survive. Three arched windows, outlined by mouldings, are set above the level of the door; each is filled with a deeply-cut forward-facing human head and neck. All of the figures seem to have classical fringed hair, though hardly any facial features remain. Flanking the central door are four taller arched niches, paired vertically. Each pair is set within its own border moulding with a broad horizontal border dividing them, into which the lower arch is cut. These niches contain full-length human figures, facing inwards, though details of heads and clothing are now lost.
B (narrow): All decoration on the broad base has been lost. What survives on this face is a single incomplete panel flanked by a cabled moulding and a narrower inner lateral border. This contains a single-stemmed spiral-scroll plant of which three volutes survive, each side-shoot springing from a ridged node. The spirals have no central fruit but each has a pointed (? and serrated) drop leaf which is linked to the end of the spiral. A rounded bud on a short stem springs from the node between the main stem and spiral. At the bottom of the panel the scroll was clearly more complex, though that area is now heavily damaged. What is visible are crossing stems and two pointed leaves, with hollowed centres, on either side pointing upwards.
C (broad): Two panels survive. (i) On the base, surrounded by a broad border, is a six-strand plait, broken part-way along. (ii) The only surviving shaft panel above is flanked laterally by both a cable moulding and a narrower inner border; this border runs across the bottom of the panel. Set within these frames is a further broad arched frame, with slab capitals, containing a seated haloed figure, forward-facing and holding a book in his left hand whilst his right hand is raised across the volume. Facial features are now indistinct but he has (possibly re-cut) deeply drilled eyes, and the hair and halo are well marked; a drapery fold falls between the knees. The feet overlie the inner frame.
D (narrow): Two panels survive. (i) On the base is a simple pattern B knot, using median-incised strands, surrounded by a cable moulding and a narrower inner frame. (ii) Above, on the shaft, the panel is bordered laterally by a cabled moulding and an inner frame. It contains two and a half volutes of spiral scroll whose main stem springs from a cup shape in the lower left corner. The spirals separate from the main stem at the bottom of the curve, and run parallel with it before turning away. A rounded bud on a short stalk separates stem and spiral. Drop-leaves emerge from the centre of the spiral; these appear to be pointed, veined and serrated, the central example having pellets/small leaves at its base. At the bottom of the panel, curving over the top of the cup and then across the main stem, is a side shoot terminating in a round scooped leaf. In the lower right corner is a vertical shoot leading to a upward-pointing veined and serrated leaf.
This shaft is an ambitious and elaborately carved piece, something of that ambition being indicated by the fact that the particular form of complex cable moulding is best paralleled on the cross at Dewsbury (Collingwood 1915, 164, 166; Coatsworth 2008, ills. 199–201, 218–20, 230–4). The same type of squared base occurs early at Otley (Coatsworth 2008, ills. 568–71) and is later exploited in the north-west region at Anderton and Bolton le Moors (Ills. 397–404, 409–12).
The two scrolls (Ills. 510, 514) differ marginally in their organisation, though both are of the tightly spiralled variety which is familiar on several shafts at Lancaster, on Halton St Wilfrid 6 and Halton Green and, further north, at Heversham (Ills. 492, 504, 570–6, 578–80, 588, 590, 596; Bailey and Cramp 1988, ill. 353). The scroll on face D (Ill. 515) has the characteristic 'western split-stemmed' form of a group of western vine-scrolls which reach geographically from Lowther in Westmorland to the Lune valley (Chapter IV, p. 15, Fig. 11). All of the leaf forms can be found among the Lancaster and Lune valley group as well as further north at Lowther (Bailey and Cramp 1988, ills. 435–9): the pointed serrated leaf at Gressingham 1 and Lancaster St Mary 2 (Ills. 458–61, 570–6); the hollowed single pellet-like bud at Halton St Wilfrid 1, Lancaster St Mary 3 and 8 (Ills. 466, 579–80, 596); and the form with two pellets/leaves at the base of Gressingham 2 and Halton St Wilfrid 6 (Ills. 462, 492).
One detail is not exactly paralleled elsewhere in the group. This is the way in which a leaf stem drops from the centre of, and interlaces through, the spiral to terminate in a foliate form. This however had already occurred on the Irton cross in Cumbria (Bailey and Cramp 1988, ills. 363, 364) and is extremely close to the forms seen at Lowther (ibid., ill. 354), Gressingham 1, Halton St Wilfrid 6, Halton Green 1, Lancaster St Mary 2 and 3 and Lancaster Vicarage Field 1 (Ills. 458–61, 492, 504, 570–6, 578–80, 606), where the centre of the spiral terminates without fruit or leaf, and a leaf drops (but without interlacing) from the bottom of the spiral.
The scroll on face D emerges from a cup-like source whose contoured curving lip sprouts a side shoot (Ills. 514–15). This is not a feature found elsewhere in Northumbria or Mercia. Other scrolls spring from a variety of bases, including a broadened form of stem, a pyramidal or tubular ridged node, or a fluted vase-like form with incurved sides and ridged node (see for example: Auckland St Andrew, Rothbury, Jedburgh, Croft, and the Ormside bowl — Cramp 1984, pls. 5.12, 213.1219, 265.1429; Lang 2001, ill. 152; Webster and Backhouse 1991, no. 134). This Heysham form could merely be a single version of the familiar double-curved ridged node, but it is perhaps significant that it takes on a cup-like form: a vine-scroll springing from a cup would reinforce the Eucharistic symbolism of the motif. Though not identical in type, a similar association of cup and vine is found in the ornamental repertoire of chancel panels and other sculpture in sixth-century Ravenna, sixth- and seventh-century Rome, and eighth-century Metz and Paris (Meer 1959, pl. 421; Guidobaldi et al. 1992, figs. 136, 138, 144, 146, 194; Paroli 2001, fig. 98; Hubert et al. 1970, pls. 3, 24) — and its significance has been fully explored recently in relation to the so-called arrest scene in the Book of Kells (O'Reilly 1993, 110–11). In Insular sculpture there is probably another example of the same combination at Kilmorie in south-west Scotland (Bailey 1996c, fig. 9).
The scene on face A poses iconographical problems (Ills. 508–9). The heavily swathed figure standing in the door of a building suggests that this is a representation of a corpse in a mausoleum. What should be stressed is that the actual appearance of the mausoleum itself is based upon a very classical — probably fourth/fifth-century — model, for it preserves the niched busts and statues of the original multi-storied mausoleum form. An ivory diptych from Rome of c. 400, now in Munich and depicting a Resurrection scene, shows something of the appearance of the likely model, complete with its statues and busts (Stiegemann and Wemkoff 1999, ii, 688–91, no. X, 2), whilst a ninth-century Resurrection ivory in the Bargello, Florence, and a silver staurothek of Pope Paschal I (817–24) suggest that similar forms were available and exploited in the Carolingian world (Harbison 1992, iii, fig. 918; Mitchell 2001, fig. 10; see also Gaborit-Chopin 1995, 55). The crosses, set on their tall stems, represent an explicit Christianisation of the building; the buildings on Winwick 1D and on a Hoddom shaft have similar features on their roofs (Ills. 708, 715; Cramp 1970, Taf. 47, 1).
The problem lies in identifying the swathed figure. Similarly wrapped figures, standing in doorways, are a constant element in depictions of the Raising of Lazarus (Jensen 1995). They can be found in the art of the fourth-century sarcophagi and catacombs, among fourth- to sixth-century ivories, in the sixth-century Rossano Gospels and Gospels of St Augustine, on seventh-century Visigothic sculpture, figuring among the eighth-century paintings of John VII's oratory in Rome, and in ninth- and tenth-century ivories and paintings (Cabrol and Leclerq 1929, figs. 6991–7021; Harbison 1992, iii, figs. 849, 855–7; Schiller 1972, pl. 25; Durliat 1985, pl. 197; Lasko 1994, pl. 111; Beckwith 1970, pl. 38; Weitzmann 1977, pls. 29, 41; Volbach 1976, nos. 107, 119, 125, 145, 163, 170, 173b, 179–180, 194, 197, 204; Jensen 2000, figs. 7, 22, 48, 62). It is, however, not a scene which is well evidenced in Insular art. Nowhere does it clearly appear in Irish or Scottish sculpture (Harbison 1992, i, 259–60), whilst in England it only occurs three times, in entirely different forms, at Rothbury in Northumberland, at Great Glen in Leicestershire and Cundall/Aldborough in Yorkshire (Hawkes 1996, 85–7; Bailey 1990, fig. 2; Lang 2001, 35, ill. 180). Essentially its significance is as an assurance of resurrection and eternal life promised in baptism, and a type of Christ's own saving death and resurrection spelled out by John XI, 20–27: Hawkes (1996, 93; 2003d, 355–8) has assembled a series of commentaries from Augustine, Ambrose, Pseudo-Bede, Alcuin, the Blickling Homilist and Ælfric which all make precisely this point.
There is one major objection, however, to this identification: there is no accompanying figure of Christ, who, whatever the number and disposition of attendant figures in such scenes, is always present in other examples.
Other possible explanations must therefore be entertained. Given the complex nature of the tomb, and the use of this 'statues-in-niches' type of mausoleum to form the setting of a Resurrection scene on the Munich ivory and Pope Paschal I staurothek, could this be a depiction of Christ's resurrection? Yet Christ is never depicted as a corpse — the point of the Resurrection symbolism is to show the tomb as empty — and the figure here lacks the expected halo.
A third possibility can therefore be considered: that this represents the dead being resurrected — a version of a theme which is found on Carolingian and Ottonian ivories where the dead are shown coming out of their building-like tombs. Usually this depiction is paired with the Crucifixion (Schiller 1972, pls. 366, 371, 373), but an ivory book-cover of the ninth century, later used on the Book of Pericopes of Henry II which is now in Munich, shows a small building with a single figure within it, surrounded by other empty and emptying graves, which offers a parallel at a roughly contemporary date (Harbison 1992, iii, fig. 897). The same theme can be found later on an ivory panel of c. 1050 now in Brussels (Lasko 1994, pl. 211; see also Durliat 1985, pl. 586; for a general survey of Resurrection theology and art see Bynum 1995).
In her analysis of the Rothbury cross, Hawkes (1996) demonstrated the manipulation of traditional iconography within Anglian sculpture. I suggest that this Heysham scene represents an analogous re-working of sources in order to depict the Resurrection of the Dead, but employing elements (swaddling and elaborate tomb — perhaps even the three crosses topping the tomb with their reference to Calvary) which more properly relate, and thus allude, to the resurrection of both Lazarus and Christ. This identifying of the three resurrections would be perfectly in keeping with contemporary commentaries: the Lazarus scene was a type of Christ's own resurrection (Jensen 2000, 170–1), and two fifth-century ivories make the identity of the two episodes clear by their inclusion of the Lazarus miracle on the doors of the Resurrection mausoleum (Volbach 1976, no. 111; Buckton 1994, no. 45). The relevance of these biblical resurrections to the promised resurrection of the individual Christian is a commonplace of Christian thought (Jensen 2000, 170–1). Heysham's scene is thus a visual statement of the theme of resurrection, available to all Christians after Christ's own triumph over death.
The figure on face C is seated and haloed; he carries a book and his hand is apparently raised in blessing, though the exact detail of the fingers is not entirely clear. Analogies for this figure suggest that it could be either an apostle (or saint) or a form of Christ in Majesty. Both apostles and saints are shown in this manner with blessing hand and a book (e.g. Hubert et al. 1969, pls. 116, 166). However, the fact that we are dealing with a single figure suggests that this is a portrait of the risen Christ, here seated in Glory or Judgement — an economic statement of the theme which can be paralleled elsewhere (Rice 1959, pl. 107; Hubert et al. 1970, pls. 277, 283).
[1] The difficulties of distinguishing between the original provenances of sculpture from this site have been emphasised by recent excavations (Potter and Andrews 1994, 104, and fig. 2). The following list therefore combines material from both St Peter's church and St Patrick's chapel.
[2] The following are general references to the Heysham stones: Robson 1850, 28; Jackson 1889, 33; Allen 1894, 4, 8; Micklethwaite 1898, 348–9; Taylor, H. 1898, 42; Howarth 1899, 9, 21; Nicholson 1899, 21; Grafton 1904; Ditchfield 1909, 117; Grafton 1909; Farrer and Brownbill 1914, 110; (–––) 1923, 288; Curwen 1925, 30; Collingwood 1927a, 15; Hogarth 1934; Bu'lock 1972, 67; Fellows-Jensen 1985, 402, 405; Crosby 1998, 30; Higham, N. 2004a, 27; Blair 2005, 216, 218, 309, 376, 457; Salter 2005, 42; Newman, R. M. 2006, 103.
The following are unpublished manuscript references: BL Add. MS 37550, items 617–46, 735–6; BL Add. MS 37551, items 72–5; Lancaster Public Library, no. PT 7; Manchester Public Library, Hibbert Ware S. MSS: Msf 091 H21, V, 64 (no. 5), 82 (no. 1); vol. 8, 98v. For the Hibbert Ware collection see Henry and Trench-Jellicoe (2005, 239–60).
