Select a site alphabetically from the choices shown in the box below. Alternatively, browse sculptural examples using the Forward/Back buttons.
Chapters for this volume, along with copies of original in-text images, are available here.


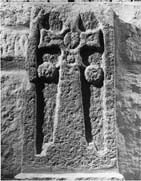
Object type: Slab or grave-marker [1]
Measurements: H./L. 54.5 cm (21.5 in); W. 31.5 > 22 cm (12.4 > 8.7 in); D. 11.5 cm (4 in)
Stone type: Medium-grained, massive sandstone (painted white)
Plate numbers in printed volume: Pl. 55.270-272
Corpus volume reference: Vol 1 p. 79
(There may be more views or larger images available for this item. Click on the thumbnail image to view.)
A (broad): The sides and the arched top are framed by a flat-band moulding. There is no moulding at the base, from which springs a cross set in a single block base. The sharply tapering shaft supports a cross-head of type B9. The head is surrounded by a fine roll moulding and in the centre of each arm is a small roundel. In the centre of the cross is a large boss, with an incised line on it which may be secondary. On either side of the shaft, just below the head, are bosses which seem to have been decorated.
B (narrow): Framed in a flat-band moulding are two long strands, loosely twisted.
C (broad): Not visible.
D (narrow): Three grooved strands, framed by a flat-band moulding.
Although small grave-markers with relief crosses as the central motif are fairly common in this area in the late Saxon period (see Aycliffe 12), this is a deeper and more confident carving than the rest. The cross is a skeuomorph of a metal cross and the curious posies on either side of its head could be seen as hanging wreaths. The strange angular twists or lines on the narrow sides are also found on the edges of 4. These two pieces might therefore have formed part of the same scheme, such as the altar surround. The twists are not, however, as confident as on 4 or on the sundial (no. 8), so that it is possible that this slab is later than both.
