Select a site alphabetically from the choices shown in the box below. Alternatively, browse sculptural examples using the Forward/Back buttons.
Chapters for this volume, along with copies of original in-text images, are available here.


Object type: Part of grave-cover [1]
Measurements: L. 85 cm (33.5 in); W. 43 cm (16.9 in) at end, < 47 cm (18.5 in) in centre; D. 38 cm (15 in) at end, < 42 cm (16.5 in) in centre
Stone type: Limestone, pale yellow-buff, medium to coarse, ooidal and sparsely bioclastic, well cemented. Middle Jurassic, Bajocian, Upper Lincolnshire Limestone Formation, Ancaster Stone
Plate numbers in printed volume: Ills. 100-3
Corpus volume reference: Vol 12 p. 168-70
(There may be more views or larger images available for this item. Click on the thumbnail image to view.)
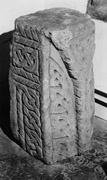
Shelton 2 is about one half of a major decorated grave-cover that has been cut in half transversely across the centre for reuse as building material. Like Shelton 1, the monument represented by Shelton 2 is correctly described as a 'hogback' monument (Lang 1984, 97–103), as it has a distinctive bowed profile in both plan and elevation. In terms of Lang's classification, the shape of the monument would have been either type IX, X or XI ('house type', 'enriched shrine type', 'scroll type'), but oddly enough Lang himself associated it with his type VIII, that is the same 'wheel rim' type as Shelton 1.
A (top): The ridge of the monument's coped 'lid' is marked by a very pronounced double cable moulding, which has been broken away by mechanical damage towards the monument's original centre. The moulding divides in the final third of the lid as it approaches the end of the monument, and creates a triangular panel at what resembles a 'hipped gable' end. Within this triangular panel sits a very accurately cut pattern of interlace of triskele form (Cramp 1991, fig. 25, Bi); the interlace strands being enhanced by an incised medial line. The two sloping panels of the monument's 'roof' are defined along their borders with faces B and D by a second cable moulding. Within, both panels are decorated with interlace in low relief, whose strands are enhanced with an incised medial line. As these panels narrow towards the end of the monument, the interlace is relieved by an etiolated triangular fillet. The two interlace strands are laid out to the same design: a run of interconnected knots (of simple pattern E). A 'free end' at the end of both runs is simply tucked beneath and unornamented. The bold fillet between the lower edge of the gable containing the triskele and face C appears to have been left undecorated.
B (long): The whole of the decoration has been planed away as part of the process of squaring-up the stone for reuse as building material.
C (end): A greatly weathered surface marking the original end of the monument. It was evidently undecorated.
D (long): The decoration on this face is distributed between two panels: a transverse upright panel towards the end of the monument and a longitudinal one occupying the majority of the face. The transverse end panel is defined by double cable mouldings both at its arris with face C and along its boundary with the longitudinal panel. It extends further into the plinth than the longitudinal panel adjacent, but unfortunately this boundary is damaged. The longitudinal panel is divided from the plinth by a single cable moulding, and beneath both panels was originally a substantial undecorated plinth, now much nibbled and abraded. Within the transverse panel towards the end of the monument is a unit of interlace, laid out as motif vi from the range deployed on mid-Kesteven covers (Everson and Stocker 1999, fig. 10), in low relief and enlivened by a medial line. The longitudinal panel is occupied by a run of four-strand interlace in low relief with the strands enhanced with a medial line, which emerges from the end of the cable-moulding that forms the lower boundary of the panel. It contains a row of three 'free rings', and has two 'free ends' at one end, which are linked together to return at the other. This last detail occurs close to the break in the stone, now represented by face E, and indicates that this longitudinal panel must have been divided into two just beyond. Whether this division was achieved by a 'bull's head' motif, or perhaps another transverse panel, is now unknowable.
E (end): Inaccessible, but presumed to be entirely recut and to belong to the division of the monument into two stones for use as building material.
F (bottom): This appears to represent the original surface of the bottom of the monument, though it has suffered from considerable damage along its outer angles. It is greatly weathered, which probably suggests that it was placed facing outwards in its secondary context.
Of the two monuments at Shelton, this second major cover is perhaps the more elaborate, for all that it is probably somewhat later in date. Its stone type is indistinguishable from the mid-Kesteven covers (p. 53), yet few other examples of monuments of this precise shape have been noticed in the literature, either amongst the local Ancaster products, or from the hogback group more widely. There are two broadly similar monuments in the churchyard at Lanivet and in the church at St Tudy in Cornwall (Langdon 1896, 412–16; Preston-Jones and Okasha 2013, 163–4, 203–4, ills. 124–30, 229–33), and what may be a closer parallel from Avening, Gloucestershire, also in a Jurassic limestone though not Ancaster, and very much smaller (Bryant with Hare 2012, 128, no. 2, ill. 5). Nevertheless, the shape is clearly intended to be reminiscent of the 'house' or 'shrine' discussed by many writers; for example by Bailey (1980, 92–7, pl. 27; 1996, 83). More clearly than Shelton 1, therefore, Shelton 2 was intended in a very real sense to be perceived as a 'house of the dead'.
The style of the interlace cutting, as well as the employment of double cable mouldings here is typical of the great range of shafts and grave-covers from the quarries of the Ancaster area (Everson and Stocker 1999, passim). Although the layout of the monument is unique within the group, there are important similarities, too, between Shelton 2 and the enormous group of 49 monuments so far identified as mid-Kesteven covers (ibid., 36–46; this volume pp. 53–61, Fig. 8). In particular, the surviving flank of the monument is laid out in the manner that was to become standard for members of this group, with a longitudinal panel occupying most of the central space of the flank, with two transverse panels at either end. Shelton 2 even had a division of some sort in the centre of the longitudinal panel, though it was evidently not of quite the same type as in most known members of the mid-Kesteven cover group. The mid-Kesteven cover group, then, might be regarded as a geometrical simplification of monuments such as Shelton 2; converting, as it were, the design features of the latter to fit on a simple rectangular chest. All of the interlace details on Shelton 2 can be found amongst members of the mid-Kesteven cover group. The knots of simple pattern E on the lid, for example, are found at Barrowby 1, Burton Pedwardine 2, Sempringham 1 (and probably elsewhere), whilst the chain of 'free rings' occurs at Lincoln St Mary le Wigford 2. Within face D, Shelton 2 even offers an example of interlace emerging from the frame of the panel, a detail that is also distinctive in the mid-Kesteven group. The close similarities between Shelton 2 and the mid-Kesteven cover group suggest that this monument might be placed close to the start of that tradition of funerary sculpture from Ancaster. Production of this group of monuments as a whole has a date range from the later tenth century to the early eleventh century (Everson and Stocker 1999, 44–5), and it seems likely that the Shelton monument should be placed towards the earlier end of that date bracket; perhaps in the third quarter of the tenth century. This close relationship between Shelton 2 and the mid-Kesteven covers marks it out as a something of a 'transitional' monument between the complex geometry of the 'Trent Valley' hogbacks, like Shelton 1, and the mid-Kesteven covers group as a whole, which are so clearly simplifications of the 'Trent Valley' design (Everson and Stocker 1999, 35; Stocker and Everson 2001, 233–4).
