Select a site alphabetically from the choices shown in the box below. Alternatively, browse sculptural examples using the Forward/Back buttons.
Chapters for this volume, along with copies of original in-text images, are available here.


Object type: Cross-shaft in ten fragments, with missing pieces replaced by modern stone [1]
Measurements:
H. (of original fragments) 220.7 cm (86.9 in):
(as reconstructed) 306 cm (120.5 in)
W. (to top of original fragments):
45.7 > 30 cm (18.7 > 11.8 in)
D. (to top of original fragments):
34.3 > 19.7 cm (13.5 > 7.8 in)
H. as reconstructed, including the cross-head:
359 cm (141.3 in)
Stone type:
Original stones: Sandstone, pale brown, soiled, coarse to very coarse grained, quartzose, quartz-cemented, slightly micaceous in places. ?Addingham Edge Grit, Millstone Grit Group.
Modern replacements: Sandstone, buff, coarse to very coarse, with quartz pebbles, quartzose, quartz cemented. The presence of quartz pebbles suggests a possible source in the local Rough Rock Formation, Millstone Grit Group (?Bramley Fall Quarries near Kirkstall Abbey). [G.L.]
Plate numbers in printed volume: Ills. 478-86; 488-92; Fig. 16
Corpus volume reference: Vol 8 p. 198-202
(There may be more views or larger images available for this item. Click on the thumbnail image to view.)
In 1837, R. D. Chantrell was appointed architect for the restoration and partial rebuilding of the church. In the course of this work, the tower was pulled down in 1838, and from this many fragments emerged. Chantrell himself (1856–7, 534–8) first commented on the discovery, saying that he paid labourers to bring any carved stones found to his office: some (the fragments of what is now the parish church cross) he removed to his home (see below). In the same publication, he mentioned that 'of the six other pillars, I only obtained one or two fragments of each', so that the numbers surviving today seem to account for all those saved by his interest. Pettigrew (1864, 310) also reported that fragments of crosses had been found in 1838 in the demolition of the tower, and subsequent papers suggest this is the date of discovery for all those now in the church and in the museum. The next earliest mentions tend to be after 1877, when the fragments which make up the cross now in the parish church were returned to Leeds.
The ten fragments making up the shaft (Leeds (St Peter) 1a–k) and the head attached to it Leeds (St Peter) 6) were originally taken by the architect, R. D. Chantrell, who in 1841 set them up in his garden in Leeds, then took them with him when he moved to Newington Butts, London and again on a subsequent move to Rottingdean, near Brighton. Chantrell (1856–7) records their discovery and his removal of them to London, 'to enable me to study its sculptures at my leisure, and consult other antiquaries relative to its peculiarity, and endeavour to ascertain its date'. His interest, unusual in the 1830s, was prompted by his belief that the pieces were emblematic of ancient Judaic and pagan astronomical symbols, going back to Babylonian and/or Druidic times (although he did not venture to date it). A notice by Professor Westwood and Mr Way (see (–––) 1865, 502) claimed wrongly that the stones had been destroyed when the architect's house at King's Cross was demolished, having been required for the railway. The architect's son H. W. Chantrell immediately repudiated this story (1865, 575), pointing out that his father had never lived at King's Cross and the cross had never been built into a house wall, but had always been kept free-standing in a garden. After his death, Major R. W. Moore (1877) recovered the cross at his own expense and returned it to Leeds, where at first it stood in the stonemasons' yard before it was restored to the parish church. Moore (1877, 57–60) also reprinted Chantrell's own account of these stones.
A cross-shaft of tapering rectangular section. The edges seem to be squared, with a raised flat moulding on each vertical edge. Three of the four faces are panelled. Only the topmost section is a modern restoration on all faces.
A (broad): Fragments a and b on this face represent adjoining parts of panel Ai. This clearly had two ring-knots joined by glides. The knots are formed from six strands, of which two emerge below to end in inward curling tips, while on either side two strands twist and join. Above these, outer pairings join to form the connecting glide and then split again to enter the second knot.
Panel Aii, made up of fragments c and d, survives only on the right: the left half is a mirror -image restoration, assuming a symmetrical centred figure, although the asymmetrical figure in Aiv below shows that this is not a safe assumption. The figure is frontal with an oval head with faint traces of the eye. His hair with an outward curl sits around the top of his head and there are indications of curls or waves. The figure has stylised drapery curving over his shoulders and partly covering his arm from which his left hand emerges holding an object before him, perhaps a book. The drapery curves have been interpreted in the restoration very definitely as a wing, but this is by no means certain. The curved line below the hand has been interpreted as indicating a rather egg-shaped termination to the body of the figure but could be a continuation of a fold, and there are indications on the right that the figure's dress continued further below.
Panel Aiii is made up from four separate pieces (fragments e, f and part of g, h) and is useful because it shows a flat panel divider both above and below. It contains two registers of an interlace pattern, turned and spiralled pattern C with paired joinings. The pattern is slightly distorted, which suggests the use of a template in its laying out.
Panel Aiv includes the lower part of fragments g, h, and fragments j, k, with some damage at the join and part of the edge moulding missing on the right at the top of the lower fragment j. The figure has the oval head of the figure in Aii but his hair or possibly nimbus is more rigid, even bar-like, and the position of his arm shows he is facing left. The stylised folds clearly delineate a cloak or robe draped over his shoulders, but if the left side of the panel had not survived the downward curving edge might have caused this, too, to be interpreted as a wing. The undergarment which leaves only a foot uncovered is not much longer than the overlying robe. The figure holds a sword in his hand, and below this, at the bottom left, is an angular interlace knot. A bird in profile, with a downward-curving beak, three -clawed feet and delineated tail feathers, perches on the figure's shoulder. There is a broad, plain area below this panel which seems to indicate that this was indeed the lowest panel of the shaft, but see the foot of face D.
B (narrow): This face is much flatter in style than it appears in Collingwood's drawings. It is divided into two panels, Bi and Bii. Bi comprises fragments a, b, c, and most of d. This has at the top four rather angular volutes of a simple plant-scroll with plain nodes. Each of the two upper volutes has a single pointed drop leaf fitted to the space available in the spandrels, the third has a tri-lobed leaf. All the nodes produce a stylised triangular bud between the volutes. The terminal of the upper volute is partly missing but the next below produces a leaf and bud between two round berry bunches expressed by cross-hatching, and each of the next two volutes has one similar fruit bunch. Below the plant-scroll is a short run of interlace which may have developed into the plant-scroll originally. It terminates in a Stafford Knot (simple pattern E) at top and bottom, with, in between, two pattern C interlace loops.
A plain flat border separates this panel from Bii, which comprises part of fragment d, and fragments f, h and k. This consists of a twist in which every turn of the twisting strand is embellished with a twisted loop. The pattern increases in size as the shaft widens. Below is the remains of a pattern in which the end of a single loop survives at the top, and at the bottom part of a circling strand out of which emerge two strands ending in two inward-turned scrolls. This could have been a simpler form of the ring-knot as on Ai.
C (broad): The restored portion at the top of the shaft is completely fanciful: the slight remains at the top of fragment a can be, and have been, interpreted as the claws and wing tips of a bird.
Panel Ci comprises fragments a, b, and part of c. The upper part of b has been damaged across its whole width and only the left side of c, also very damaged at this point, has survived. It has a frontal figure with a long egg-shaped face on which pointed oval eyes, a narrow but slightly wedge-shaped nose, and a small slit mouth, are still clearly marked. He has a dished nimbus and long hair which pierces this and curls outwards over his shoulders. The middle of his body is missing. The stylised drapery of his robe appears above the break as vertical and curved parallel folds on the lower part of fragment b. The slight remains at the top of c have been interpreted as the hem of this robe and the foot below it, but this is now impossible to see.
Panel Cii comprises the remainder of fragment c, and fragments d, e and f. Like c, d survives only on the left. This shows the left half of a frontal figure with the familiar egg-shaped head, a possible trace of a nimbus, and hair which appears in front of it and ends in a club-tipped curl. Fragment d shows the familiar down-curving drapery from which emerges a hand holding a small book, held up on the figure's right. The continuation on fragments e, f convincingly shows the termination of the robe, the long straight undergarment, and the figure's right foot resting on the flat panel divider.
Panel Ciii comprises fragments g, h, and j. The lower left side is a restoration. The scene shows a female figure held aloft by a frontal figure entangled in interlace which ties him to wings of which the whole survives on the right, and the top of the second on the left. A selection of smith's tools is depicted on the bottom right.
D (narrow): This face appears to have had a continuous plant-scroll without any panel breaks, although it has not survived in its complete length. It appears on fragments a, b, e, g and j. The length opposite c and d, where only half the width of the cross has survived, is completely missing. The scroll starts at the bottom right abruptly from the right border: below this are two scrolls filling the space at the base, also starting from the side edges. Five volutes of a spiral scroll are represented on e, g and j, with plain nodes from which sprout paired leaves with a bud between. The inner side of the spirals sprout long leaves with curling or clubbed tips, and similar leaves drop from the two lower spirals. Somewhere in the gap between e and b the nature of the scroll changes and possibly there is a missing panel border. The stem then becomes merely a sinuous curving line, a simple scroll, producing frond-like split leaves.
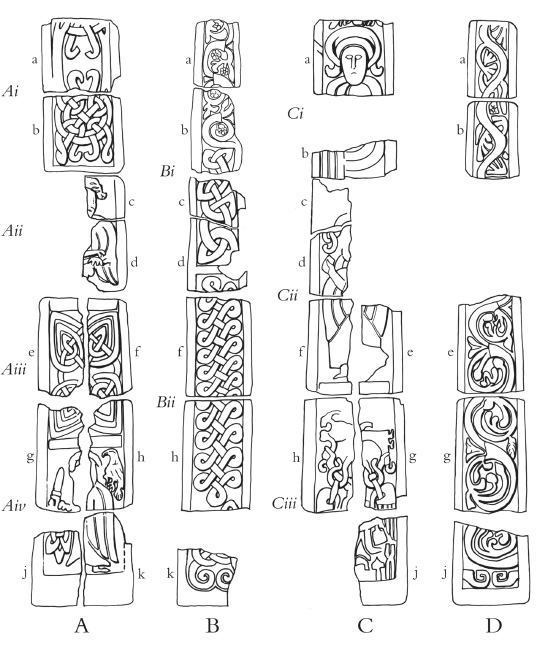
Fig 16: Leeds 1a-k, showing fragments and panels
This cross is a most important piece for it provides the fullest demonstration of two significant tendencies in the sculptural history of this region: the strength of the Anglian tradition as it pertained to the type and programme of decoration for a cross-shaft; and the influence not merely of Scandinavian taste but of specific themes and pattern types.
The Anglian tradition is manifest in the panelled arrangement evident on three faces (and there may have been two panels on face D also), and in some of the subjects and details of the figure panels on the two broad faces. In particular, the dished halo of the figure at the top of face C (Ill. 482), and the outward curling hairstyles (although here at the end of a trend towards a stylisation in which curling hair and halo as on Otley 1 gradually became one (Lang 1978c, 18)). The nimbed frontal figures with books, as a whole, in fact, clearly belong to this tradition. The plant-scroll too is strongly rooted in the Anglian past, and not too far removed. The interlace panel Aiii, of spiralled pattern C (Ill. 491), is also found on the fine eighth- to ninth-century cross-shaft from Cundall/Aldborough, north Yorkshire, face B (Lang 2001, 95, ill. 181) and on a ninth-century piece, possibly a fragment of church furniture, from Kirkbymoorside, east Yorkshire (Lang 1991, 158, no. 6, ill. 536). Its relationships within the area are to Ilkley 5 and Collingham 2 (Ills. 378, 172). The distortions to the pattern at Leeds show that this was not drawn up on a grid but instead implies the use or reuse of a template: nevertheless its use here shows a considerable indebtedness to and awareness of earlier work in the region.
The knot at the top of face A (Ill. 492), with its curling clubbed tendrils, however, has clear associations with the Scandinavian styles. The twist on face B (Ill. 490) which Collingwood (1915a, 216) described as 'Como braid' because of its occurrence in late antique, early Christian sites in Italy, he thought linked with classicising tendencies of Anglian ninth-century sculpture, but it seems not actually to be found in sculpture of that date. It appears on Scandinavian-influenced sculpture in north Yorkshire: Hawsker 1B and Kirklevington 1B (Lang 2001, ills. 320, 401); and in co. Durham on a shaft from Sockburn, no. 7, faces B and D (Cramp 1984, pl. 134.727, 729). It thus has to be seen as expressive of Scandinavian taste, whatever its remoter origins.
The most famous aspect of this taste is the scene at the foot of face C (Ill. 485). This was first recognised as the escape of Weland (O.N. Vǫlundr) from captivity in a flying machine by Browne (1885a, 139); confirmed by a more detailed study by Lang (1976a, 90–3) where it is illuminated by its relationship with other examples from Yorkshire, on Sherburn 3A (Lang 1991, 203, ill. 768) and Bedale 6A (Lang 2001, 61–2, ill. 23), as well as Leeds 2cA below (Ill. 487). The same scene, including the captive woman, also appears on a Gotland picture stone, Larbro St Hammars III (Lindqvist 1941–2, pl. 30, fig. 85). The identity of the seized female figure is unknown unless it is a conflation of a scene involving Beaduhild (Lang 1991, 203). Lang also noted a combination of a saint with a winged motif above, on Sherburn 2, face A (a cross which is related to Sherburn 3), as probably also at the top of Leeds 1, face C (ibid., 202; see Ill. 482).
The scene at the base of face A (Ill. 486) is more enigmatic. Browne (1885c, 155) interpreted this scene as Sigurd; Lang (1976a, 91–2) saw it as repeating the Weland theme, as the sword and bird are also attributes of Weland. Collingwood (1915b, 307), however, thought it a portrait as on the Bewcastle cross (Bailey and Cramp 1988, 69–70, ill. 96), and this possible link with the Anglian past is also interesting, reminding us both of the possibility of memorial portraiture from an early period, but also of the increased use of such portraiture under the influence of the Scandinavian invaders: here evidenced on Otley 6 and Weston 1 (Ills. 608, 777, 781).
Undoubtedly this was a Christian monument, however, and the inclusion of the Weland scene or scenes then would appear to be an attempt to find a familiar Scandinavian expression which could be linked to a Christian theme.
