Select a site alphabetically from the choices shown in the box below. Alternatively, browse sculptural examples using the Forward/Back buttons.
Chapters for this volume, along with copies of original in-text images, are available here.


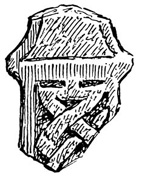
Object type: Fragment of cross-shaft and -head [1]
Measurements: (after Collingwood 1915a) H. 28 cm (11 in); W. 21.5 cm (8.5 in); D. 14.5 cm (5.75 in)
Stone type: Not recorded
Plate numbers in printed volume: Ills. 101-4
Corpus volume reference: Vol 8 p. 109-10
(There may be more views or larger images available for this item. Click on the thumbnail image to view.)
This cross is known only through Collingwood's drawings, description and measurements (Collingwood 1915a, 150, figs. s–v), from which it appears to be a cross of rectangular section, with a free-armed head of type B10. The shaft and head were apparently outlined with flat mouldings. It seems to have had extensive traces of paint: Collingwood believed it showed evidence that the frame and pattern elements were picked out in paint. The surviving colour, which Collingwood (1915a, 150) had tested, appears to have been red lead.
A (broad): The lower arm of the cross is plain. In the shaft can be seen the bar terminal of angular interlace or twist.
B (narrow): Collingwood drew the side of the head as if plain, and the side of the shaft as if worn or damaged.
C (broad): The terminal of an interlace pattern, possibly half pattern F (compare Burnsall 3C).
D (narrow): This has an incised lattice of diamond shapes, described by Collingwood as 'coarse diamond-broaching' (ibid.). This side showed strong evidence of paint.
Collingwood believed this to be very late, because of the angular interlace on face A and the simple incised design of face D. However the size and form of the monument, including its head, and even features such as the angular bar terminal, are found on other crosses at Burnsall.
